Home Assistant - core of your smart home
Overview
Home Assistant is home automation system that is designed to be the central control system for smart devices in your home. Its core version can be installed as container and there are arm images available, so RPi can be used as hardware platform for it.
Installation with Helm
It’s recommended to have persistent volume claim created before as there will be stored main configuration file (configuration.yaml) and main database (home-assistant_v2.db), in example below nfs-client storageclass is used for that. LoadBalancer service type is used based on Metallb functionality.
cat > home-assistant-pvc.yaml
apiVersion: v1
kind: PersistentVolumeClaim
metadata:
  namespace: "home-assistant"
  name: "home-assistant-pvc"
  annotations:
    volume.beta.kubernetes.io/storage-class: nfs-client
spec:
  accessModes:
    - ReadWriteOnce
  resources:
    requests:
      storage: "5Gi"

cat > home-assistant-web.yaml
apiVersion: v1
kind: Service
metadata:
  annotations:
    metallb.universe.tf/address-pool: default
  name: home-assistant-web
  namespace: home-assistant
spec:
  type: LoadBalancer
  selector:
    app.kubernetes.io/name: home-assistant
    app.kubernetes.io/instance: home-assistant
  ports:
    - port: 80
      targetPort: 8123

cat > home-assistant-values.yaml
env:
  TZ: Europe/Vilnius

persistence:
  config:
    enabled: true
    existingClaim: home-assistant-pvc

kubectl create namespace home-assistant

helm repo add k8s-at-home https://k8s-at-home.com/charts

helm install -n home-assistant --values home-assistant-values.yaml home-assistant k8s-at-home/home-assistant
ESPHome
With a help of ESP32 micro-controller it’s possible to use BLE (Bluetooth Low Energy) to query smart devices via Bluetooth from one side and to be connected to Wifi network to pass collected data to Home Assistant control system from another side.
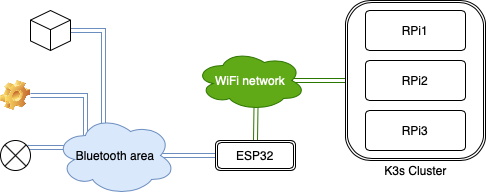
ESPHome is a system to control ESP8266/ESP32 micro-controllers by simple yet powerful configuration files and control them remotely through Home Automation systems. Number of ESP32 controllers can be used in different areas of your home due to distance limitations for Bluetooth.
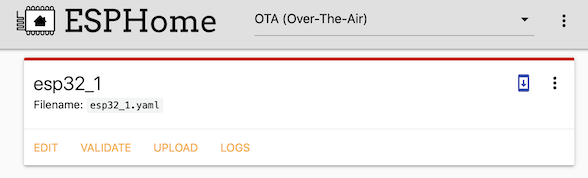
Getting Started with ESPHome describes how to start using ESPHome with examples. In few words - for in the beginning ESP32 micro-controller has to be connected via USB cable to PC (with installed ESPHome) to get initial configuration (to know how to connect to WiFi network, to configure API and OTA passwords and so on), after it’s connected to Wifi OTA (Over-The-Air) connection can be used to update its configuration going forward.
Initial ESP32 configuration may look like:
cat > esp32_1.yaml
esphome:
  name: esp32_1
  platform: ESP32
  board: esp-wrover-kit

wifi:
  ssid: "MySSID"
  password: "Whatismypassword"

  # instead of ip-address esp32 hostname can be used if dns record resolves it to ip
  use_address: 192.168.8.120

captive_portal:

# Enable logging
logger:

# Enable Home Assistant API
api:
  password: "myhapassword"

ota:
  password: "myotapassword"
After ESP32 is connected to Wifi it can be managed via Wifi (OTA) with a help of ESPHome installed with a help of Helm as container into the same home-assistant namespace.
cat > esphome-pvc.yaml
apiVersion: v1
kind: PersistentVolumeClaim
metadata:
  namespace: "home-assistant"
  name: "esphome-pvc"
  annotations:
    volume.beta.kubernetes.io/storage-class: nfs-client
spec:
  accessModes:
    - ReadWriteOnce
  resources:
    requests:
      storage: "200Mi"

cat > esphome-web.yaml
apiVersion: v1
kind: Service
metadata:
  annotations:
    metallb.universe.tf/address-pool: default
  name: esphome-web
  namespace: home-assistant
spec:
  type: LoadBalancer
  selector:
    app.kubernetes.io/name: esphome
    app.kubernetes.io/instance: esphome
  ports:
    - port: 80
      targetPort: 6052

cat > esphome-values.yaml
persistence:
  config:
    enabled: true
    existingClaim: esphome-pvc

helm install -n home-assistant --values esphome-values.yaml esphome k8s-at-home/esphome
After ESPHome is working as pod it’s recommended to move all passwords to separate file secret.yaml which should be stored at the same directory as main configuration files.
cat esp32_1.yaml
esphome:
  name: esp32_1
  platform: ESP32
  board: esp-wrover-kit

wifi:
  ssid: !secret wifissid
  password: !secret wifipassword

  use_address: esp32_1

captive_portal:

# Enable logging
logger:

# Enable Home Assistant API
api:
  password: !secret hapassword

ota:
  password: !secret otapassword

cat secret.yaml
wifissid: "MySSID"
wifipassword: "Whatismypassword"
hapassword: "myhapassword"
otapassword: "myotapassword"
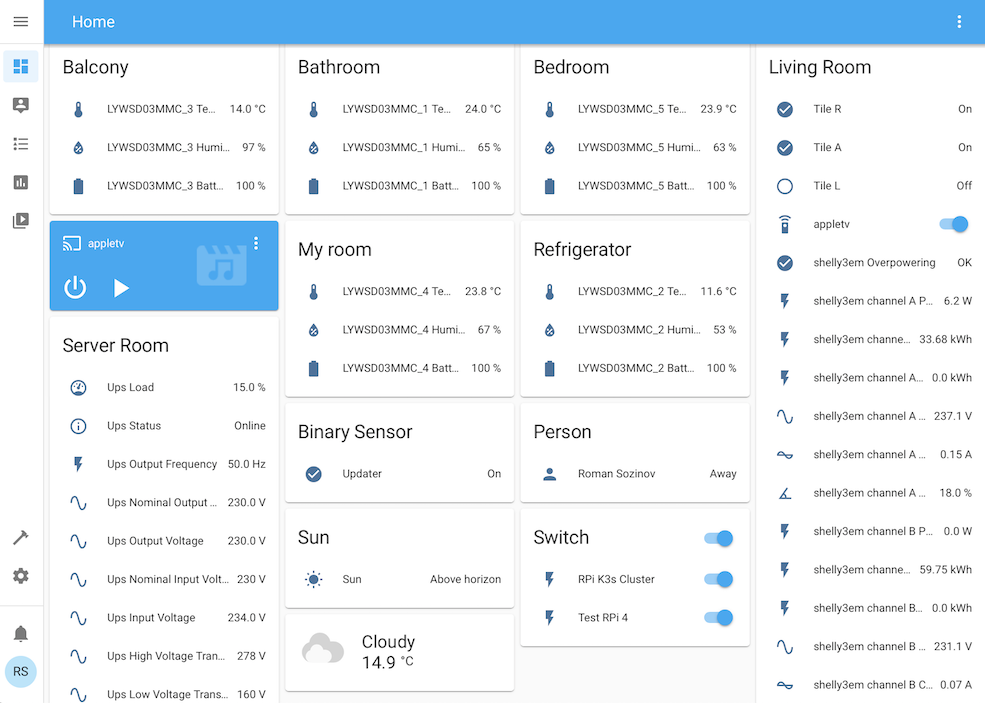
Devices which are connected to Home Assistant
Xiaomi LYWSD03MMC BLE Temperature and Humidity Display
Xiaomi LYWSD03MMC sensor can be flashed as per instruction (to get bindkey) and then with a help of ESP32 temperature and humidity data can be gathered after sensor part is added to ESP32 controller (via ESPHome). Example:
sensor:
  - platform: xiaomi_lywsd03mmc
    mac_address: "A4:C1:38:BC:5B:8F"
    bindkey: "f14210841e2f7ce8e0750e47d0c5bcf6"
    temperature:
      name: "LYWSD03MMC_1 Temperature"
    humidity:
      name: "LYWSD03MMC_1 Humidity"
    battery_level:
      name: "LYWSD03MMC_1 Battery Level"

  - platform: xiaomi_lywsd03mmc
    mac_address: "A4:C1:38:CE:4D:54"
    bindkey: "a3a8afe785b796be63477913a02ae9c0"
    temperature:
      name: "LYWSD03MMC_2 Temperature"
    humidity:
      name: "LYWSD03MMC_2 Humidity"
    battery_level:
      name: "LYWSD03MMC_2 Battery Level"
Tile
Tile trackers are visible in Bluetooth range by ESP32 controllers, so they can be tracked with a help of ble_presence plug-in as binary sensors. You can’t manage them via Home Assistant or ESPHome but it can be useful to know for instance if your keys are around or not. Example:
binary_sensor:
  - platform: ble_presence
    mac_address: FD:B3:2D:70:12:F8
    name: "Tile R"

  - platform: ble_presence
    mac_address: DE:2A:0D:41:61:47
    name: "Tile A"

  - platform: ble_presence
    mac_address: E7:B2:9D:AA:3A:E4
    name: "Tile L"
TP-Link KP105 Smart Plug
TP-Link KP105 smart plugs should be configured with Kasa mobile application and connected to Wifi first. Then the main Home Assistant configuration file (configuration.yaml) should be updated with details about tplink devices:
tplink:
  discovery: false
  switch:
    - host: 192.168.8.121
    - host: 192.168.8.122
After main configuration file is updated Home Assistant should be restarted and then tplink plugs can be added to Home Assistant via Integrations section. Once they are added power plugs can be managed remotely - via Home Assistant client (for instance from mobile phone).
Shelly 3EM/EM
Shelly 3EM power meters can be added directly to Home Assistant via Integrations section after they are configured and connected to Wifi.
UPS
If UPS network service is used via Integrations all statistics from UPS can be collected directly to Home Assistant.